A noteworthy type of security for your domain names is provided by SSL certificate. Its become very easy with Apiqcloud, to host applications that require SSL.
Generate a Custom SSL Certificate
In order to add the Custom SSL certificate to your Apiqcloud environment, you need to have:
- custom domain name purchased;
- server key;
- intermediate certificate or certificates chain (CA);
- domain certificate.
Therefore, follow the next instruction:
1. Buy a Domain name using any domain registrar (e.g. apiqcloud.com).
2. Generate your server key for the purchased domain name and create a Certificate Request on its basis with the help of any preferred tool.
Adjust Environment Topology
Note:
- for .NET, Python and Node.js applications, your environment should also include the NGINX-balancer server. In this case, the external IP address should be attached to the balancer instead of the application server as NGINX becomes the entry point of your app
- for the Docker®-based environments, only the Apiqcloud SSL option is available currently
1. Log into the Apiqcloud dashboard and create a New environment (or click the Change environment topology button for an existing one).
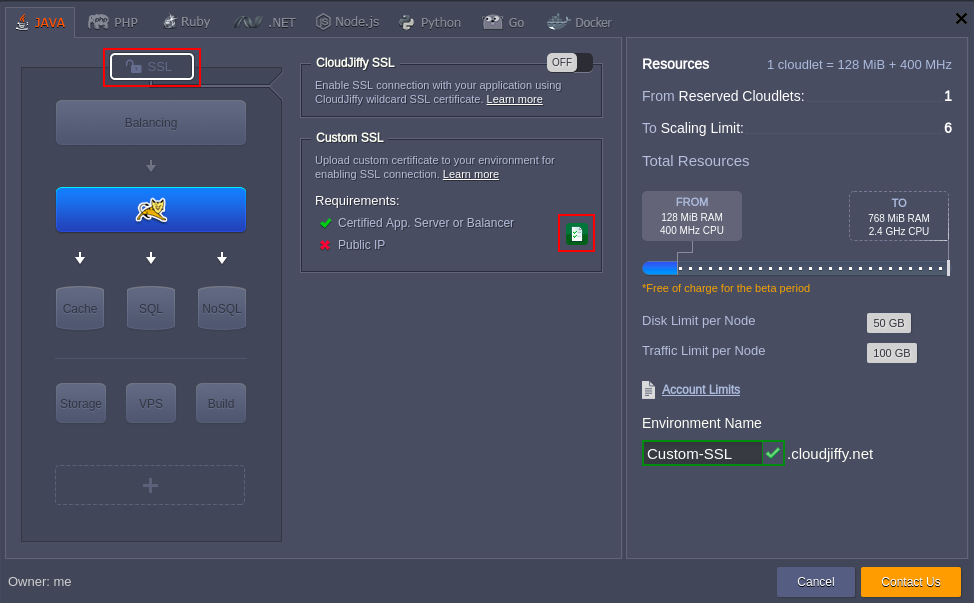
2. In the opened Environment Topology dialogue, click on the SSL switcher above the servers blocks and check if all the Custom SSL requirements are fulfilled (i.e. if all the options in the requirements list are marked with a green tick).

If they are not, Apiqcloud can help you to Adjust your environment in just one click. For that select, the appropriate button next to the list of requirements and your environment topology will be instantly tuned according to them.

To complete the adjustment, click Create for a new environment or click on Apply in case you’ve edited the existing one.
Domain Name and A Record Settings
Now you need to set an A Record in order to point your custom domain name to the Public IP address of your application.
1. Click on your environment, You will see two options of IP address.
You’ll see the list of IPs, wherein the second one is the required Public IP address. Click on it to select the whole line and copy the digits to your clipboard.

2. Then, navigate to DNS Manager of the chosen domain registrar system (the one you’ve used for your custom domain name purchase) and set an A Record within it.
Upload Certificate to the Environment
The last step you need to perform is to upload the certificate files to your Apiqcloud environment.
1. Click Settings for the configured environment.

2. In the opened tab, choose the Custom SSL option within the left-hand list.
Upload Server key, Intermediate certificate (CA) and Domain certificate into the appropriate fields. Click Save.

When the servers in your environment are automatically restarted, let’s ensure everything works properly. For that, enter the bound custom domain name (or the attached external IP address) into your browser’s address bar with https:// connection protocol specified instead of the default http:// one. Your application should be opened without any problems.

Done! Now you can be confident all the received/sent by your application data is secured and encrypted.

